6th Adventure: Please don't feed the dinosaurs!
6th Adventure: Please don't feed the dinosaurs!
Finally, that took longer than it has to take.
This adventure requires Master Wonder Mage's PotZ music pack
=The Chronomission Pentalogy=
1. Time Out
2. Please Don't feed the dinosaurs!
3. TBA
4. TBA
5. TBA
Okay, I know there would be some scenery problems, scenery is not my game anyway, but at least i tried.
There, my sixth adventure's ready for grabs! After being mysteriously teleported into a weird hub-like place straight from the forever forest, You have to investigate who's behind the mystery retro creatures. The question is: do you have enough TIME to find out?
This adventure has 6 wlvs and 20 dias, due to the capacity of most wlvs, this probably is my largest adventure to date. It's the best quality adventure of all my adventures too in my opinion, at least.
Enjoy!
You do not have the required permissions to view the files attached to this post.
Last edited by Yzfm on Sun Apr 12, 2015 6:57 am, edited 1 time in total.
Previous Adventure:Time Out
Latest Adventure:Please Don't Feed The Dinosaurs!
Upcoming Adventure: History Lessons
Latest Adventure:Please Don't Feed The Dinosaurs!
Upcoming Adventure: History Lessons
- tooncool64
- Rainbow Keeper
- Posts: 340
- Joined: Fri May 23, 2014 7:23 pm
Hmm, maybe redownload?
So, has anybody finished this yet?
So, has anybody finished this yet?
Previous Adventure:Time Out
Latest Adventure:Please Don't Feed The Dinosaurs!
Upcoming Adventure: History Lessons
Latest Adventure:Please Don't Feed The Dinosaurs!
Upcoming Adventure: History Lessons
Okay, I added some fixes and stuff in addition to making stuff easier and stuff. I also realized how difficult and messy the 3rd wlv is, so I turned the difficulty down and added some signs to explain what you're supposed to do. If any further help is needed, I might post a video solution and/or provide hints.
Out of curiosity, how far have you guys been into this adventure? (those who played it that is)
Out of curiosity, how far have you guys been into this adventure? (those who played it that is)
Previous Adventure:Time Out
Latest Adventure:Please Don't Feed The Dinosaurs!
Upcoming Adventure: History Lessons
Latest Adventure:Please Don't Feed The Dinosaurs!
Upcoming Adventure: History Lessons
Hello Yzfm, unlike some other adventures I played, this one seems to have a story line, with an exciting plot (not including MWM and InvisibleWater), especially the ice troll part. Anyway, let's get to review your adventure:
Right after the the first level (after the cutscene with Timeblast) you succeeded in bleeding my ears with that annoying scourge cannon, it would be more considerable if you slightly decrease the firing speed next time. There's another bug I'd like to point out about the stinkers, incase you didn't know about this, any NPC that is moving from a position to another will completely stop moving if it (NPC) steps on a transporter or an ice floor, I don't know how should you fix this as it is generally a bug caused by the game. there's an issue with the volcano above that white transporter puzzle where you or Bulk can pass into the volcano; the transporter puzzle was very good nonetheless. Moving along, the area with blink, flo, and flash was too simple, I did not use the flash magic at all either, just so you know.
Okay, the next level is another puzzle with a volcano, I must admit that you tested the adventure pretty well, I tried to break the whole thing with brr and pop, but neither the button got pressed, nor did the brr generate on the lava. Now for the pointless stuff: 1-I managed to reserve 2 brr charges 2-I managed to reserve 1 pop charge 3-I reserved about 3 pow charges but that doesn't matter since pow was the last magic to use 4- the little brr charger above the volcano is not much of use, at all.
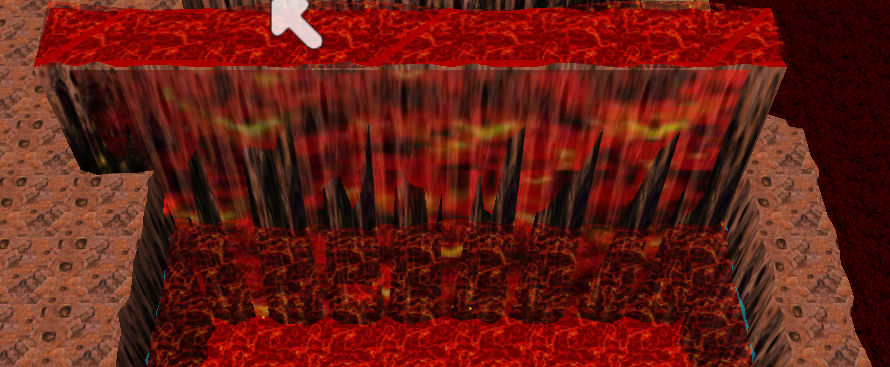
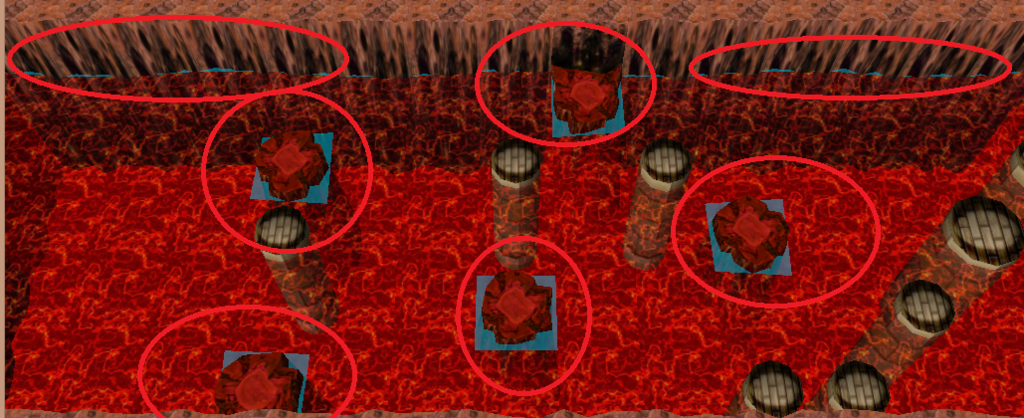
Now, I'm in the volcano, and I managed to reach the stinkers, but there are some graphical issues in this level as well, here are two pictures, the first one is a buggy waterfall (probably because the walls are jagged and are not smooth), and the second picture is the floating water on most of the floors, I advise you to neglect the water height (about -5.2 atleast) or change the water to lava.


Moving on.... I cannot deny that the boss was great, it was rather interesting and really challenging as you continue to battle the Queen Flower.
This is probably everything, I also finished the adventure (not gold ) within 40 minutes and a couple of seconds, good job! I'll be happy to play any upcoming levels from you!
Right after the the first level (after the cutscene with Timeblast) you succeeded in bleeding my ears with that annoying scourge cannon, it would be more considerable if you slightly decrease the firing speed next time. There's another bug I'd like to point out about the stinkers, incase you didn't know about this, any NPC that is moving from a position to another will completely stop moving if it (NPC) steps on a transporter or an ice floor, I don't know how should you fix this as it is generally a bug caused by the game. there's an issue with the volcano above that white transporter puzzle where you or Bulk can pass into the volcano; the transporter puzzle was very good nonetheless. Moving along, the area with blink, flo, and flash was too simple, I did not use the flash magic at all either, just so you know.
Okay, the next level is another puzzle with a volcano, I must admit that you tested the adventure pretty well, I tried to break the whole thing with brr and pop, but neither the button got pressed, nor did the brr generate on the lava. Now for the pointless stuff: 1-I managed to reserve 2 brr charges 2-I managed to reserve 1 pop charge 3-I reserved about 3 pow charges but that doesn't matter since pow was the last magic to use 4- the little brr charger above the volcano is not much of use, at all.
Now, I'm in the volcano, and I managed to reach the stinkers, but there are some graphical issues in this level as well, here are two pictures, the first one is a buggy waterfall (probably because the walls are jagged and are not smooth), and the second picture is the floating water on most of the floors, I advise you to neglect the water height (about -5.2 atleast) or change the water to lava.


Moving on.... I cannot deny that the boss was great, it was rather interesting and really challenging as you continue to battle the Queen Flower.
This is probably everything, I also finished the adventure (not gold
Thanks for the feedback! I'm glad you enjoyed it, and I'm sorry for the plenty of graphical errors  , I'd better watch out for that for future adventures.
I'll remember these points for my upcoming adventures, thanks again for the feedback!
I'll remember these points for my upcoming adventures, thanks again for the feedback!
Previous Adventure:Time Out
Latest Adventure:Please Don't Feed The Dinosaurs!
Upcoming Adventure: History Lessons
Latest Adventure:Please Don't Feed The Dinosaurs!
Upcoming Adventure: History Lessons
- loofisawesome
- Rainbow Wizard
- Posts: 410
- Joined: Mon Mar 17, 2014 9:05 pm
Sorry, I don't seem to get what you're referring to.
If you are referring to the first puzzle in the 2nd wlv (the first gameplay wlv), then you do not need more than one pop charger.
If you are referring to the conveyor/transportyer pop puzzle in the third wlv (the second gameplay wlv), well, you don't get any more pop than what you collect as you enter the puzzle. You have to save one pop charge as you exit the puzzle to use on the swamp button.
If it's none of the above, then please specify the part you're stuck on and whether you need anymore hints, and I'll be happy to help
Previous Adventure:Time Out
Latest Adventure:Please Don't Feed The Dinosaurs!
Upcoming Adventure: History Lessons
Latest Adventure:Please Don't Feed The Dinosaurs!
Upcoming Adventure: History Lessons
- loofisawesome
- Rainbow Wizard
- Posts: 410
- Joined: Mon Mar 17, 2014 9:05 pm
Okee dokee, what do you need the other pop for?
If you need to know, the pop charger goes to:
If you need to know, the pop charger goes to:
the swamp button in the scouge area
Previous Adventure:Time Out
Latest Adventure:Please Don't Feed The Dinosaurs!
Upcoming Adventure: History Lessons
Latest Adventure:Please Don't Feed The Dinosaurs!
Upcoming Adventure: History Lessons
- loofisawesome
- Rainbow Wizard
- Posts: 410
- Joined: Mon Mar 17, 2014 9:05 pm
Yeah, to activate the lower bridges you need to press the swamp button beside the iceflower.
If you're totally stuck, here's how to:
If you're totally stuck, here's how to:
Use the pow to kill the iceflower,
Then, quickly use the grow on ice so that nest time when the burstflower charges, it unfreezes Veloce AND destroys itself.
Previous Adventure:Time Out
Latest Adventure:Please Don't Feed The Dinosaurs!
Upcoming Adventure: History Lessons
Latest Adventure:Please Don't Feed The Dinosaurs!
Upcoming Adventure: History Lessons
- loofisawesome
- Rainbow Wizard
- Posts: 410
- Joined: Mon Mar 17, 2014 9:05 pm
Here's the full solution, the picture contains illustrations for the solution.
http://i.imgur.com/4b8V3GS.png
1. Use the two brrs as shown in the image
2. Ride the topmost transporter along the white arrow
3. Slide across the right brr pad.
4. Ride the two bottom most transporters to the two white X's with red circles.
5. Step off the bottom most transporter and use both floings on the two transporters.
6. Press the white button and use the teleporter to go to the island with the grow charger
7. Use the grow charge on the green circle.
8. Step on the stone button to raise the bridge back to the first island.
9. Ride the transporters back to the mainland.
Previous Adventure:Time Out
Latest Adventure:Please Don't Feed The Dinosaurs!
Upcoming Adventure: History Lessons
Latest Adventure:Please Don't Feed The Dinosaurs!
Upcoming Adventure: History Lessons
